The GMPP Kit 19212670 instruction are very good, but for a DIY. Here's some problems you will come across.
Let's get started: Tools: 4mm Allen wrench, 10mm socket w/6" extension (3" will work), wire cutter, wire stripper, heat shrink, solder, solder iron, black tape, mechanics hook tool, cutting tool ( uses a dremel tool), needle nose pliers, hammer, punch set, marker & lighter.
1) Leave Key off. This is all you have to do to kill all power to the MAP sensors.
2) Pop off engine cover.
3) Follow GMPP instructions, until step (3). Skip step (4), Move to step (5)
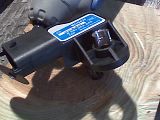
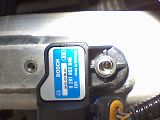
4) Step (5) Use the hook tool to remove the new GREEN O-ring off the TMAP sensor. Replace it with the BLUE one from the kit. Lube the BLUE O-ring with clean motor oil. The O-ring goes on quite hard. Be careful not to damage it.
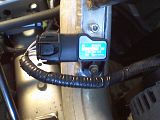
When I went to install the intake TMAP. The holes don't line up. GM states you my have to tip slightly to start hold down bolt. Mine alignment was off over .030". Sideway pressure on plastic sensors is not good IMO. So I covered the O-ring & opening of the TMAP.
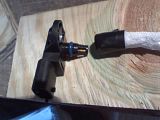
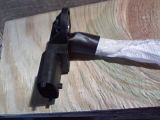
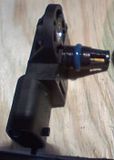
Press out the metal sleeve out of the TMAP. Cut the O.D. of the mounting bolt out of the sleeve with my Dremel. Press it back in to the TMAP, with the cut out facing the right (see pics.)
5) Complete steps (6 & 7) of your GMPP instructions sheet.
6) Now go back to step (4) of your GMPP instructions sheet.
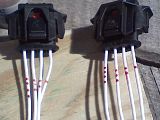
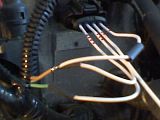
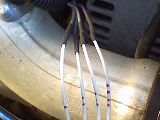
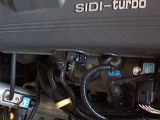
Once TMAP is installed. It's easier to run & wire-up the new TMAP plug into the OEM wire harness. Mark the wire with a marker. To read easier the pin location of the new TMAP plugs. If you are new at this. Cut, solder & heat shrink wrap one wire at a time. IMO you should always solder wire connections & heat shrink wrap whenever possible. When exposed to the weather.
7) Complete steps (8 & 9) of your GMPP instructions sheet.

Skip step (10), move on to step (11) of your GMPP instructions sheet.
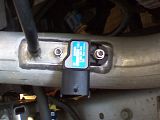
9) Step (11) Use the hook tool to remove the new GREEN O-ring off the TMAP sensor. Replace it with the BLUE one from the kit. Lube the BLUE O-ring with clean motor oil. The O-ring goes on quite hard. Be careful not to damage it.
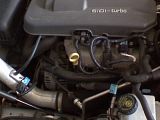
When I went to install the pressure side IC pipe TMAP. The holes don't line up either . GM states you my have to tip slightly to start hold down bolt. Mine alignment was off over .030". Sideway pressure on plastic sensors is not good IMO. So I covered the O-ring & opening of the TMAP.
Press out the metal sleeve out of the TMAP. Cut the O.D. of the mounting bolt out of the sleeve with my Dremel. Press it back in to the TMAP, with the cut out facing the right (see pics.)
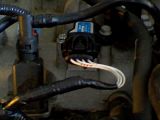
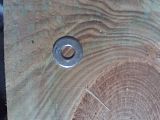
10) Complete steps (12 & 13 ) of your GMPP instructions sheet. In step (12) add a 6mm flat washer to cover the mounting hole of the TMAP.
11) Now go back to step (10) of your GMPP instructions sheet.
Once TMAP is installed. It's easier to run & wire-up the new TMAP plug into the OEM wire harness. Mark the wire with a marker. To read easier the pin location of the new TMAP plugs. If you are new at this. Cut, solder & heat shrink wrap one wire at a time. IMO you should always solder wire connections & heat shrink wrap whenever possible. When exposed to the weather.
12) Complete steps (14 &15) of your GMPP instructions sheet. Remember to clean areas with alcohol. So the sticker no come off.
Side note by soldering & shrink wrap all connections. You GMPP Kit looks installed at the factory. Not spliced in & after thought with bulky solder-less connectors. IMO

Your done, just have to make an appt. to have your New tune installed. With no tune, I went for a 5 mile test drive. The car ran fine and no codes. Speeds from 0 to 65mph on my test run. So it looks to be fine to drive to my dealer.
Mike
[attachment=1]


